Replacing Maps Timeline With Owntracks
By hernil
Timeline is (sort of) shutting down
Does this look familiar?
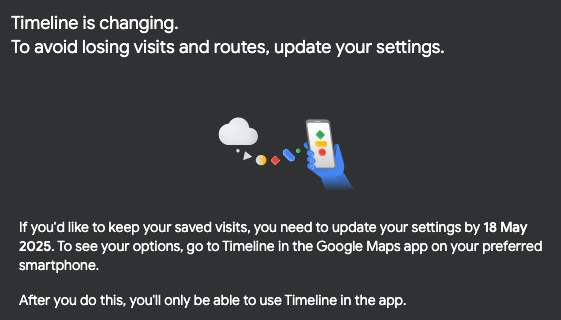
Maps has been nagging me about Timeline going device-only for quite a few months now. That means that it will no longer be accesible in a browser, only on the local device Google Maps app. And while I’ve been phasing out Google services for a while now it’s finally the push I needed to seriously look into alternatives for this particular use case.
Location data is one of the more sensitive sources of data I’ve given Google blanket access to, but at the same time Timeline has been one of the features I’ve enjoyed to have and at times found very useful. Quite a prime example of trading privacy for convenience. I could of course just start using the local only Timeline, but I don’t believe the backup function will be smooth enough that I’ll do it regularly. A lost device and suddenly there could be months of data gone.
Well, it’s finally time to move away.
Where to go?
Some quick research will probably surface at least these three alternatives:
I tried Dawarich before settling on Owntracks (for now).
As for why? Dawarich seems like a cool project with a very active mantainer. It’s pretty, has momentum and there’s a lot of neat stuff going on there. If this sounds interesting I highly suggest you check out the project. I will surely keep an eye on it and re-evaluate at a later time.
So why go for Owntracks then? I have location data from Timeline going back to 2013. That’s 12 years where this has been running in the background on my phone and leaving breadcrumbs of datapoints for me to look at when needed. In those years I’ve been hands off and never once had to debug why something was not working. In the two weeks I had Dawarich parsing my Timeline export data it crashed at least three times and took a lot of resources on my server. I’m not going into details here, and I think it’s fine for a young project like Dawarich to move fast and break things in the beginning, but I’m looking for boring here. Owntracks is almost 10 years old and it’s location data is saved as monthly flat files with datapoints. Owntracks had three releases in 2024 while Dawarich has had more in the last three weeks. That’s the boring I’m looking for just now.
Setting it up
Owntracks has a “Recorder” backend and the ability to recieve data from multiple client sources. It also sports a frontend that adds a bit to the otherwise extremely bare bones interface.
The Recorder can listen to incoming data on either HTTP or MQTT. MQTT is protocol for message exchange on queues or topics. You can post messages one-to-many or many-to-one - and I guess many-to-many if that’s your thing.
If you are looking into Owntracks for your self only, and you want to use the Owntracks app as the client, then you might just want to use HTTP. If using Docker the secret is setting the OTR_PORT=0 environment variable. This disables MQTT listening and without it the Recorder doesn’t want to start.
MQTT
Personally I ended up using MQTT. More on why later.
MQTT is used for quite a lot of things in the IoT and Smart Home sphere so there’s a good chance you have that set up already. If so just use that Broker.
I never had a real use for it before so I had to spin up an MQTT Broker and just settled on Mosquitto.
I created a Docker network so other containers can talk to mosquitto using that.
sudo docker network create mqtt-net
networks:
  mqtt-net:
    external: true

services:
  mosquitto:
    image: eclipse-mosquitto:latest
    hostname: mosquitto
    container_name: mosquitto
    restart: unless-stopped
    ports:
      - "1883:1883"
      - "9001:9001"
    networks:
      - mqtt-net
    volumes:
      - ./mosquitto:/etc/mosquitto
      - ./mosquitto/mosquitto.conf:/mosquitto/config/mosquitto.conf
Yes, I do expose the ports by binding them to my host and thus bypass the dediceted mqtt-net. That’s because my Home Assistant installation has network_mode: host for various reasons. Other containers will be able to use the network later of needed though. Including the Owntracks Recorder.
mosquitto.conf
allow_anonymous false
password_file /etc/mosquitto/passwd
listener 1883 0.0.0.0
In ./mosquitto/passwd configure a user like this:
username:passwd
and then run sudo docker exec mosquitto mosquitto_passwd -U /etc/mosquitto/passwd which by the looks of the output hashes the password with bcrypt as you would see used for basic auth.
Owntracks Recorder
Everything is set up using Docker.
I use Traefik as a reverse proxy so that talks to my containers using the web network. The Recorder talks with Mosquitto over the mqtt-net network. There’s a .env file with OTR_USER and OTR_PASS in the folder as well. Note that Traefik is not needed for this setup. It’s just for my convenience and ties into my existing setup.
I have not configured Mosquitto to go through Traefik and although it should be possible I have never used a TCP router yet so it would need some looking into. And while Traefik is great for some things, setting new things up for the first time in it is never really smooth in my experience.
networks:
  web:
    external: true
  mqtt-net:
    external: true
  internal:
    external: false

services:
  owntracks-recorder:
    image: owntracks/recorder
    restart: unless-stopped
    container_name: owntracks-recorder
    expose:
      - 8083
    environment:
      - OTR_HOST=mosquitto
      - OTR_PORT=1883
      - OTR_USER=${OTR_USER}
      - OTR_PASS=${OTR_PASS}
      - TZ=Europe/Oslo
    volumes:
      - ./store:/store
    labels:
      - traefik.http.routers.owntracks.rule=Host(`recorder.example.com`)
      - traefik.http.routers.owntracks.tls=true
      - traefik.http.routers.owntracks.tls.certresolver=lets-encrypt
    networks:
      - web
      - mqtt-net
      - internal

  owntracks-frontend:
    image: owntracks/frontend
    restart: unless-stopped
    container_name: owntracks-frontend
    expose:
      - 80
    environment:
      SERVER_HOST: owntracks-recorder
      SERVER_PORT: 8083
      TZ: Europe/Oslo
    volumes:
      - ./frontend-config.js:/usr/share/nginx/html/config/config.js
    labels:
      - traefik.http.routers.owntracks-frontend.rule=Host(`owntracks.example.com`)
      - traefik.http.routers.owntracks-frontend.tls=true
      - traefik.http.routers.owntracks-frontend.tls.certresolver=lets-encrypt
    networks:
      - web
      - internal
frontend-config.js
// Here you can overwrite the default configuration values
window.owntracks = window.owntracks || {};
window.owntracks.config = {
  api: {
    baseUrl: "https://owntracks.example.com",
  },
};
Importing Timeline Data
The first step is to download the Timeline data using Google Takeout. If you’ve already started using the device-only Timeline you will have to bridge that specific gap yourself. Exporting is going to take a few hours or days from the request is submitted.
Next, the Owntracks Recorder has a script for pushing the Takeout data to MQTT. However this is a bit of a detour as the Recorder keeps the data in flat text files.
(Very much) inspired by this blog post I decided to use their Python script and transform the location data from Timeline to Recorder format locally. No MQTT, no network requests, just some Python. It makes the whole thing a whole lot quicker.
I did this locally on my computer. Create a folder with the script, put the Records.json file from the Timeline export in the same folder and run once (make sure you have the dependencies installed - should be Pandas and Matplotlib only). It will output an image. Depending on how many devices you have had with the Timeline feature turned on there might be overlap in location data. I used some of the overlap to identify and skip data from some devices like my tablet. I put the ids outputed in the excluded_devices list. I have no clue why the ids are in the format they are …
And yes, this should have been two scripts. Sorry, not sorry :-)
Python script
#!/usr/bin/python
import pandas as pd
import matplotlib.pyplot as plt

df_gps = pd.read_json('Records.json', typ='frame', orient='records')

import time
import json
import os

# https://owntracks.org/booklet/features/tid/
tracker_id = 'gm' # A two-character identifier

print('There are {:,} rows in the location history dataset'.format(len(df_gps)))

output_folder = "output"

df_gps = df_gps.apply(lambda x: x['locations'], axis=1, result_type='expand')
df_gps['latitudeE7'] = df_gps['latitudeE7'] / 10.**7
df_gps['longitudeE7'] = df_gps['longitudeE7'] / 10.**7
df_gps['timestamp'] = pd.to_datetime(df_gps['timestamp'], format='ISO8601', utc=True)

excluded_devices = [396761250,881893324,-1757523773,159217416,-154961851,-1803839803,-234567978,1833189005]
owntracks = df_gps.rename(columns={'latitudeE7': 'lat', 'longitudeE7': 'lon', 'accuracy': 'acc', 'altitude': 'alt', 'verticalAccuracy': 'vac'})
owntracks['tst'] = (owntracks['timestamp'].astype(int) / 10**9)
matched = owntracks['deviceTag'].isin(excluded_devices)
if len(owntracks[matched]) == 0:
    print("Didn't find matching deviceTags. Double check your excluded_devices")
    exit(1)
owntracks = owntracks[~matched]

files = {}

years = df_gps['timestamp'].dt.year.agg(['min', 'max'])

df_gps.sort_values(by='timestamp', inplace=True)
devices = owntracks['deviceTag'].unique()

plt.figure(figsize=(10, 6))
colors = plt.cm.viridis_r([i / len(devices) for i in range(len(devices))])

for i, device in enumerate(devices):
    device_data = df_gps[df_gps['deviceTag'] == device]
    first_year = device_data['timestamp'].dt.year.min()
    last_year = device_data['timestamp'].dt.year.max()
    middle_year = (first_year + last_year) / 2

    plt.hlines(y=i, xmin=first_year, xmax=last_year, color=colors[i], linewidth=4)
    plt.text(middle_year, i + 0.25, device, verticalalignment='center', fontsize=8)

plt.xlabel('Year')
plt.ylabel('Device')
plt.title('Device Reporting Years')
plt.grid(True)

plt.show()

if not os.path.exists(output_folder):
    os.makedirs(output_folder)

for year in range(years['min'], years['max'] + 1):
    for month in range(1, 13):
        files[f"{year}-{month}"] = open(f"{output_folder}/{year}-{str(month).rjust(2, '0')}.rec", 'w')

try:
    for index, row in owntracks.iterrows():
        d = row.to_dict()
        record = {
            '_type': 'location',
            'tid': tracker_id
        }
        record['tst'] = int(time.mktime(d['timestamp'].timetuple()))

        for key in ['lat', 'lon']:
            if key in row and not pd.isnull(row[key]):
                record[key] = row[key]
        for key in ['acc', 'alt', 'vac']:
            if key in row and not pd.isnull(row[key]):
                record[key] = int(row[key])

        timestamp = row['timestamp'].strftime("%Y-%m-%dT%H:%M:%SZ")
        line = f"{timestamp}\t*                 \t{json.dumps(record, separators=(',', ':'))}\n"
        files[f"{d['timestamp'].year}-{d['timestamp'].month}"].write(line)
finally:
    for key, file in files.items():
        file.flush()
        file.close()
Once you’ve put the ids you want to exclude in the list you can delete the output folder and run the script again. The resulting output folder can now be moved to the Owtracks Recorder store.
rsync -r output/ server_with_owntracks:/path/to/owntracks/store/rec/hernil/backport/
Navigating to the Owntracks Frontend now should let you look a given interval of location data on a map. It’s not fancy but it’s pretty functional. In my experience fetching up to a month of location data at a time works ok. Anything more than that turns a bit sluggish. I’m sure there could be ways to trim the data somewhat for larger intervals but it’s not really much of a use case for me anyway.
Home Assistant as the location tracker
Now we just need to make sure data keeps ticking in going forward.
Owntracks has its own app, and I ran the that for a few days and it worked fine. But, I already have Home Assistant on my phone, and it already has a location function pushing data to my server. It just doesn’t keep a very smooth history of the whole thing. There’s probably ways to do this whole setup in Home Assistant only, but seperation of concerns is nice.
So, why not just let my Home Assistant instance push the data it recieves from its app on to Owntracks’ Recorder?
You need to add the Home Assistant MQTT integration and then add an automation. Configuring the MQTT integration should be pretty self explanetory. Make sure the username and password matches the one you set for Mosquitto earlier.
Just using YAML for the automation saves some click-opsing (although I’ve got to say I rerely do anything other than that in Home Assistant these days). You need to find what device tracker you want to use for this. For me it’s my trusty old Samsung S20 that does the job.
alias: Send S20 Location to OwnTracks
description: ""
triggers:
  - entity_id: device_tracker.sm_g981b
    trigger: state
actions:
  - data:
      topic: owntracks/hernil/s20 # owntracks/user/device
      payload: |
        {
          "_type": "location",
          "t": "p",
          "tid": "ha",
          "lat": {{ state_attr('device_tracker.sm_g981b', 'latitude') }},
          "lon": {{ state_attr('device_tracker.sm_g981b', 'longitude') }},
          "alt": {{ state_attr('device_tracker.sm_g981b', 'altitude') | default(0) }},
          "vac": {{ state_attr('device_tracker.sm_g981b', 'vertical_accuracy') | default(0) }},
          "acc": {{ state_attr('device_tracker.sm_g981b', 'gps_accuracy') | default(0) }},
          "vel": {{ state_attr('device_tracker.sm_g981b', 'speed') | default(0) }},
          "cog": {{ state_attr('device_tracker.sm_g981b', 'course') | default(0) }},
          "tst": {{ now().timestamp() | int }}
        }
      retain: true
    action: mqtt.publish
On Android I honestly found the HA location data to be just as good as the Owntracks application. A tad more verbose in that it does not hold pushes if you haven’t moved but that just plays into the “Heatmap” function of the Frontend where a larger amount of points in an area signifies time spent there. So I’ll just take the theoretically redundant information data.
On my wife’s iPhone the Home Assistant location updates is not quite where I want them to be. They are very infrequent and do not work as a replacement for location sharing in Maps just yet. I’ll have to look into tweaking something although my first pass didn’t reveal anything obvious that wasn’t set sensibly in the app settings. If you know what it could be feel free to tell my be email!
Sources and further reading
MQTT Explorer was nice for debugging MQTT messages. I spent quite a few hours understanding why Owntracks was not showing me data from Home Assistant. Turns out I missed a closing " quotation mark in a json key. The joys of programming!
Techno Wizardry blog post with the whole Python hack for importing data.
Homa Assistant OwnTracks integration which I think does the reverse of what I wanted. ie. importing Owntracks data to HA. I’m not 100% sure that it can’t do either direction though so could be worth looking into.